Running A Bitcoin Full Node
The previous post was a brief introduction on Bitcoin and full nodes. This post will cover how to set up a full node on your system.
Running your own Bitcoin full node means that you configured a computer with the Bitcoin Core software and have a full copy of the entire Blockchain database on it.
Requirements
Bitcoin Core requires a one-time download of about 350GB of data plus a further 5-10GB per month. To run a full node, you will need a system that meets the following requirements:
- A desktop or a laptop computer running Windows, MacOS, or Linux
- At least 2 GB of RAM
- At least 500 GB of free disk space, with a minimum read/write speed of 100 MB/s
- An unmetered broadband/fiber internet connection with high upload speed and limit
In this post, we shall look into the process of installing a full node on a Linux machine from a pre-built binary version downloaded from the Bitcoin Core download page here or here.
At the time of writing this post, the latest version is 0.20.1. Click the Linux (tgz) link to download the file.
It is highly recommended to verify your download by verifying that its checksum is in this list of cryptographic checksums. Download this checksums file in the same directory as the downloaded bitcoin binary tgz file, and from this directory, run the following command in the terminal:
sha256sum --ignore-missing --check SHA256SUMS.asc
where SHA256SUMS.asc is the downloaded checksums file.
You should see a line that shows OK against the name of the downloaded file like:
bitcoin-0.20.1-x86_64-linux-gnu.tar.gz: OK
Next, obtain a copy of the release signing key by running the following command:
gpg --keyserver hkp://keyserver.ubuntu.com --recv-keys 01EA5486DE18A882D4C2684590C8019E36C2E964
The output of the command above should say that one key was imported like:
gpg --verify SHA256SUMS.asc
Now, verify that the checksums file is PGP signed by the release signing key:
gpg --verify SHA256SUMS.asc
The output from the verify command should contain a line that starts with:
gpg: Good signature
and a complete line:
Primary key fingerprint: 01EA 5486 DE18 A882 D4C2 6845 90C8 019E 36C2 E964
Now, if other people you trust can confirm that the key fingerprint printed above belongs to the Bitcoin Core Project’s release signing key, you have essentially verified your download. Now, you can proceed with installing Bitcoin on your system.
First, extract the downloaded Bitcoin GZipped Tar File with the command:
tar xzf bitcoin-0.20.1-x86_64-linux-gnu.tar.gz
This will create the directory bitcoin-0.20.1/ within your current working directory. Then, install the contents of its bin/ subdirectory into the /usr/local/bin directory of your system using the the install command:
sudo install -m 0755 -o root -g root -t /usr/local/bin bitcoin-0.20.1/bin/*
Navigate to the /usr/local/bin/ directory and run the ls command. You should see the bitcoin-cli, bitcoind, and bitcoin-qt executables.
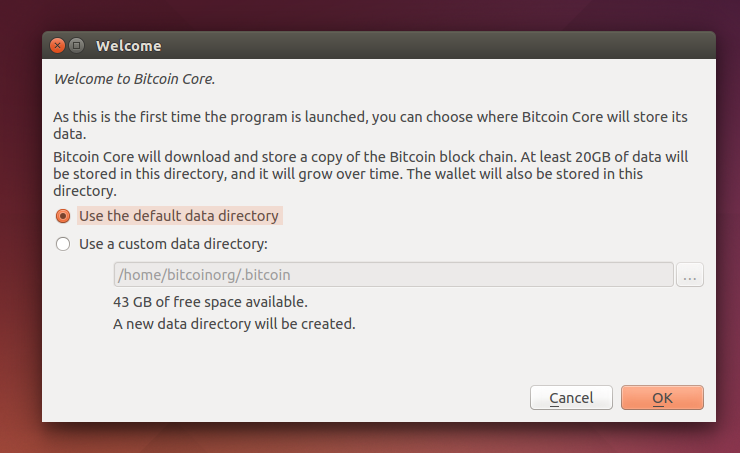
To run Bitcoin Core GUI, simply run bitcoin-qt from the terminal (make sure that the /usr/local/bin/ directory is in your PATH, which is usually true). If all the required libraries are installed, Bitcoin Core GUI will start and you will see a welcome screen like below:

You can specify the directory where Bitcoin Core will download and store a copy of the Bitcoin blockchain by choosing the default data directory, or by creating a custom data directory. This is also where the wallet will be stored.
Once done, Bitcoin Core GUI will begin downloading the blockchain, a process which is known as Initial Block Download (IBD). This step will take at least several days for a first-time download, during which Bitcoin Core will use a significant part of your connection bandwidth. You can pause the IBD anytime by closing the Bitcoin Core application, which will resume from the last download point the next time you start it.
After download is complete, you may use Bitcoin Core as your wallet or you can just let it run to help support the Bitcoin network. You now have a full node running at port 8333.
For a more exhaustive read, check out the official docs for Running a full node here.
In the next part of this series, we will look at how you can run a Lightning Node along with your full node.
Stay tuned!